This tutorial can be used for all of types False Colors Camera
For this sample, I used type of false colors camera "AVATAR Series" with Eos Canon 5D MK I and Canon Lense 70-200 F/2.8 IS MK I
1. Open Image => File Open-Select the image - Open


2. Resize Image => Image - Resize Image - width 900 pixel -OK

3. For Fit on screen - View - fit on screen or Command + 0 (Zero) [Mac OS], Ctrl + 0 [Win OS]

4. Copy Layer /Cmd + J (Mac OS), Ctrl + J (Win OS) or drag and drop background to Create a new layer
5. Select Image - Auto Contrast

6. Merge layer Cmd + Alt + Shift + E (Mac OS) or Ctrl + Alt + Shift + E (Win OS)
7. Select Filter - Nik Collection - Color Efex Pro 4
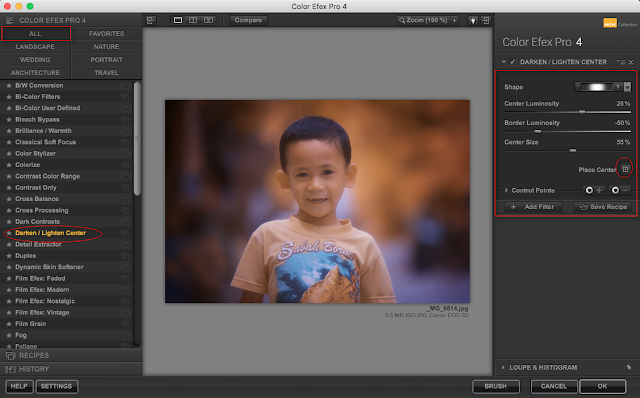
8. Select Darken / Lighten Center on left menu and then select Shape and adjust as your taste with slider left or right, don not forget for place point "Place Center" to Object center - click OK to apply
Until here you can look change before and after for this image
Next step :
9. for color balance will used on the right button doc panel - Color Balance - Midtones -Cyan-Magenta-Yellow Adjust as your taste and then you can adjust slider Opacity to left
10. Merge layer Cmd + Alt + Shift + E (Mac OS), Ctrl + Alt + Shift + E (Win OS)
11. This image is still soft, so needed Sharpen - Select Filter - Other - High Pass adjust radius as your taste - OK
12. Select Blending Mode to Soft light and adjust Opacity as your taste
13. Merge layer Cmd + Alt + Shift + E (Mac OS), Ctrl + Alt + Shift + E (Win OS)
14. Reduce noise will used "Noiseware"-Select Filter - Imagenomic - Noiseware - Set default - OK
and then adjust for opacity as your taste
15. Adjustment for eyes, zoom image with "Cmd +/- (Mac OS), Ctrl +/-(Win OS)" and make sure your setting "Zoom with Scroll Wheel" is check list => Preferences - Tools - Check list "Zoom with
Scroll Wheel"
"

16. Back to normal Screen you can used - View - fit on screen or Cmd + 0 (Mac OS), Ctrl + 0 (Win OS)
17. Add a mask to a layer, click on the “Add Layer Mask” icon in the Layers panel. Click once to add a layer mask, select area for masking (make sure used " Brush tool" and "set foreground" to black color if you want switch to white ( select "X" on keyboard)


18. Merge layer Cmd + Alt + Shift + E (Mac OS), Ctrl + Alt + Shift + E (Win OS)
19. Zoom and select Lasso Tool (on panel tools) - Select eyes for adjustment - Image - Adjustment - Curve - adjustment as your taste - OK
20. Add a mask to a layer, click on the “Add Layer Mask” select area do you want masking and Fit on screen/Cmd+0
21. Create watermark as owner image -Select "T" on panel tools and write you name
22. Right Click on Doc Panel - Select Flatten Images for finish editing
23. Saving file - Select File -Save as - write name of file - and select format JPEG -apply for OK - JJPEG Option -Quality 12 - Maximum


Thank you for coming
For this sample, I used type of false colors camera "AVATAR Series" with Eos Canon 5D MK I and Canon Lense 70-200 F/2.8 IS MK I
1. Open Image => File Open-Select the image - Open


2. Resize Image => Image - Resize Image - width 900 pixel -OK

3. For Fit on screen - View - fit on screen or Command + 0 (Zero) [Mac OS], Ctrl + 0 [Win OS]

4. Copy Layer /Cmd + J (Mac OS), Ctrl + J (Win OS) or drag and drop background to Create a new layer
5. Select Image - Auto Contrast

6. Merge layer Cmd + Alt + Shift + E (Mac OS) or Ctrl + Alt + Shift + E (Win OS)
7. Select Filter - Nik Collection - Color Efex Pro 4

8. Select Darken / Lighten Center on left menu and then select Shape and adjust as your taste with slider left or right, don not forget for place point "Place Center" to Object center - click OK to apply
Until here you can look change before and after for this image
Next step :
9. for color balance will used on the right button doc panel - Color Balance - Midtones -Cyan-Magenta-Yellow Adjust as your taste and then you can adjust slider Opacity to left
10. Merge layer Cmd + Alt + Shift + E (Mac OS), Ctrl + Alt + Shift + E (Win OS)
11. This image is still soft, so needed Sharpen - Select Filter - Other - High Pass adjust radius as your taste - OK
12. Select Blending Mode to Soft light and adjust Opacity as your taste
13. Merge layer Cmd + Alt + Shift + E (Mac OS), Ctrl + Alt + Shift + E (Win OS)
14. Reduce noise will used "Noiseware"-Select Filter - Imagenomic - Noiseware - Set default - OK
and then adjust for opacity as your taste
15. Adjustment for eyes, zoom image with "Cmd +/- (Mac OS), Ctrl +/-(Win OS)" and make sure your setting "Zoom with Scroll Wheel" is check list => Preferences - Tools - Check list "Zoom with
Scroll Wheel"
"


16. Back to normal Screen you can used - View - fit on screen or Cmd + 0 (Mac OS), Ctrl + 0 (Win OS)
17. Add a mask to a layer, click on the “Add Layer Mask” icon in the Layers panel. Click once to add a layer mask, select area for masking (make sure used " Brush tool" and "set foreground" to black color if you want switch to white ( select "X" on keyboard)

18. Merge layer Cmd + Alt + Shift + E (Mac OS), Ctrl + Alt + Shift + E (Win OS)
19. Zoom and select Lasso Tool (on panel tools) - Select eyes for adjustment - Image - Adjustment - Curve - adjustment as your taste - OK
20. Add a mask to a layer, click on the “Add Layer Mask” select area do you want masking and Fit on screen/Cmd+0
21. Create watermark as owner image -Select "T" on panel tools and write you name
22. Right Click on Doc Panel - Select Flatten Images for finish editing
23. Saving file - Select File -Save as - write name of file - and select format JPEG -apply for OK - JJPEG Option -Quality 12 - Maximum
Photoshop Tutorials Video : All of type false colors Editing (Batavia Classic, Batavia Pro, Ev4 Pro, Avatar, etc )
Before and After


Thank you for coming
